显示标签为“cocos2dx技巧”的博文。显示所有博文

2014年7月3日星期四

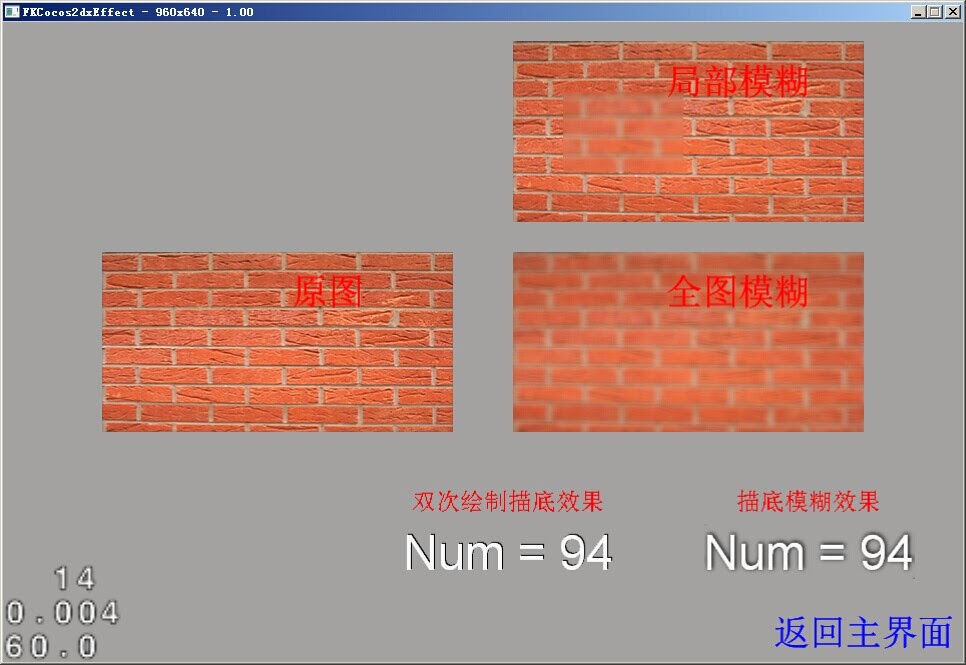
Cocos2d-x 的特效例子


主要使用 shader 做了一些效果和图片处理


部分截图


源代码和资源下载:


点这里 FKCocos2dEffectDemo

2014年4月4日星期五

Cocos2dx 中文支持,文字自动换行,逐字符显示

    依然在《三勇者传说》开发过程中,我希望出现类似于日式AVG游戏的对话面板,此时我不得不实现两种功能:
    1:文字在一个聊天框内能够自适应的换行显示。
    2:大段的文字逐字符的进行显示。
    于是我进行了简单的封装。

首先我们来看中文字符的支持:

FKCommon.h


  1. #include <iostream>
  2. #include <cstring>
  3. #pragma comment( lib, "libiconv.lib" )
  4. #include "iconv\iconv.h"
  5. //--------------------------------------------------------------------
  6. namespace FKStringConvert
  7. {
  8. int code_convert( const char* from_charset, const char* to_charset, 
  9. const char* inbuf, size_t inlen, char* outbuf, size_t outlen );
  10. /* UTF8 - GB2312 */
  11. std::string u2a( const char* inbuf );
  12. /* GB2312 - UTF8 */
  13. std::string a2u( const char* inbuf );
  14. }
  15. //--------------------------------------------------------------------
FKCommon.cpp


  1. //--------------------------------------------------------------------
  2. namespace FKStringConvert
  3. {
  4. //--------------------------------------------------------------------
  5. int code_convert( const char* from_charset, const char* to_charset, const char* inbuf, size_t inlen, char* outbuf, size_t outlen )
  6. {
  7. iconv_t cd;
  8. const char* temp = inbuf;
  9. const char** pin = &temp;
  10. char** pout = &outbuf;
  11. memset( outbuf, 0, outlen );
  12. cd = iconv_open( to_charset, from_charset );
  13. if( cd == 0 ) return -1;
  14. if( iconv( cd, pin, &inlen, pout, &outlen ) == -1 ) 
  15. {
  16. return -1;
  17. }
  18. iconv_close( cd );
  19. return 0;
  20. }
  21. //--------------------------------------------------------------------
  22. /* UTF8 -> GB2312 */
  23. std::string u2a( const char* inbuf )
  24. {
  25. size_t inlen = strlen( inbuf );
  26. char* outbuf = new char[inlen * 2 + 2 ];
  27. std::string strRet;
  28. if( code_convert("utf-8", "gb2312", inbuf, inlen, outbuf, inlen * 2 + 2 ) == 0 )
  29. {
  30. strRet = outbuf;
  31. }
  32. delete [] outbuf;
  33. return strRet;
  34. }
  35. //--------------------------------------------------------------------
  36. /* GB2312 -> UTF8 */
  37. std::string a2u( const char* inbuf )
  38. {
  39. size_t inlen = strlen( inbuf );
  40. char* outbuf = new char[inlen * 2 + 2];
  41. std::string strRet;
  42. if( code_convert("gb2312", "utf-8", inbuf, inlen, outbuf, inlen * 2 + 2 ) == 0 )
  43. {
  44. strRet = outbuf;
  45. }
  46. delete [] outbuf;
  47. return strRet;
  48. }
  49. //--------------------------------------------------------------------
  50. }
  51. //--------------------------------------------------------------------
使用方法如下:

  1. std::string szInfo = "Test中文";
  2.         std::string szUTF8 = FKStringConvert::a2u(szInfo.c_str());

第二个问题,自适应多行文字

Scene.cpp

  1. //--------------------------------------------------------------------
  2. //  自适应换行文字
  3. /* 
  4. horizontalSpacing: 水平间距 
  5. verticalSpacing:   垂直间距 
  6. lineWidth:         一行的最大宽度 
  7.  */  
  8. CCLabelTTF* CXXScene::AutoNewLineText(std::string _string, const char *fontName, 
  9. float fontSize, float horizontalSpacing, float verticalSpacing, float lineWidth, ccColor3B p_fontColor )  
  10. {  
  11. CCArray* labelTTF_arr = CCArray::create();  
  12. int index = 0;  
  13. int index_max = strlen(_string.c_str());  
  14. bool is_end = true;  
  15. // 根据ASCII码找出中英文字符,并创建成一个CCLabelTTF对象存入labelTTF_arr数组中
  16. while (is_end) 
  17. {  
  18. if (_string[index] >= 0 && _string[index] <= 127) 
  19. {  
  20. std::string englishStr = _string.substr(index,1);
  21. labelTTF_arr->addObject(CCLabelTTF::create(englishStr.c_str(), fontName, fontSize));  
  22. index+= 1;  
  23. }  
  24. else
  25. {  
  26. std::string chineseStr =_string.substr(index,3).c_str();  
  27. labelTTF_arr->addObject(CCLabelTTF::create(chineseStr.c_str(), fontName, fontSize));  
  28. index+= 3;  
  29. }  

  30. if (index>=index_max) {  
  31. is_end=false;  
  32. }
  33. }

  34. // 在CCLabelTTF对象上添加子对象CCLabelTTF,以此组合成一句话,以左上角第一个字为锚点。。  
  35. CCLabelTTF* returnTTF = (CCLabelTTF*)labelTTF_arr->objectAtIndex(0);  
  36. float nowWidth = returnTTF->getContentSize().width; // 本行的行宽
  37. CCLabelTTF* BeforeCurTTF = (CCLabelTTF*)labelTTF_arr->objectAtIndex(0);  
  38. CCLabelTTF* CurLineBeginTTF = (CCLabelTTF*)labelTTF_arr->objectAtIndex(0); // 行首最左边的字符

  39. int arr_count = labelTTF_arr->count();  
  40. for (int i=1; i < arr_count; i++)
  41. {  
  42. CCLabelTTF* CurTTF = (CCLabelTTF*)labelTTF_arr->objectAtIndex(i);  
  43. CurTTF->setColor( p_fontColor );
  44. CurTTF->setAnchorPoint(ccp(0, 0.5));  
  45. nowWidth+= CurTTF->getContentSize().width;  
  46. char* pNewLineKey = "\n"; // 该符号换行
  47. char* pMissKey = "\r"; // 该符号不处理
  48. // 宽度超长
  49. if ( nowWidth >= lineWidth )
  50. {  
  51. CurTTF->setPosition(ccp( ( -nowWidth + CurTTF->getContentSize().width) - BeforeCurTTF->getContentSize().width * 0.5f, 
  52. -BeforeCurTTF->getContentSize().height * 0.5 -verticalSpacing));  
  53. nowWidth = returnTTF->getContentSize().width;  
  54. // 保存行首
  55. CurLineBeginTTF = CurTTF;  
  56. }
  57. //  是换行符
  58. else if( strcmp( CurTTF->getString() , pNewLineKey ) == 0 )
  59. {
  60. CurTTF->setPosition(ccp( ( -nowWidth + CurTTF->getContentSize().width) - BeforeCurTTF->getContentSize().width * 0.5f, 
  61. -BeforeCurTTF->getContentSize().height * 0.5 -verticalSpacing));  
  62. nowWidth = returnTTF->getContentSize().width;  
  63. // 保存行首
  64. CurLineBeginTTF = CurTTF;  
  65. }
  66. else if( strcmp( CurTTF->getString() , pMissKey ) == 0 )
  67. {
  68. continue;
  69. }
  70. else
  71. {  
  72. CurTTF->setPosition(ccp(BeforeCurTTF->getContentSize().width+horizontalSpacing, BeforeCurTTF->getContentSize().height*0.5f));  
  73. }  
  74. CurTTF->setTag( 0 );
  75. BeforeCurTTF->addChild(CurTTF);  
  76. BeforeCurTTF = CurTTF;  
  77. }  

  78. return returnTTF;  
  79. }
  80. //--------------------------------------------------------------------

使用方式如下:

  1. std::string szInfo = "测试多行自动换行,这里随便改 by FreeKnight";
  2. CCLabelTTF* pHeadTTF = AutoNewLineText( FKStringConvert::a2u(szInfo.c_str()), "Arial", 24, 1, 10, 200, ccc3( 255, 255, 255 ) );  
  3. pHeadTTF->setColor( ccc3( 255, 255, 255 ) );
  4. pHeadTTF->setPosition( CENTER_POS );  
  5. this->addChild( pHeadTTF ); 

然后是逐字符显示功能,仅仅改动一下调用处即可,代码如下

  1. std::string szInfo = "测试多行自动换行,这里随便改 by FreeKnight";
  2. // 逐字显示
  3. CCLabelTTF* pHeadTTF = AutoNewLineText( FKStringConvert::a2u(szInfo.c_str()), "Arial", 24, 1, 10, 200, ccc3( 255, 255, 255 ) );  
  4. pHeadTTF->setColor( ccc3( 255, 255, 255 ) );
  5. pHeadTTF->setPosition( CENTER_POS + ccp( -240, -70 ) );  

  6. CCArray* pTTFList = pHeadTTF->getChildren();
  7. CCObject* pObject = NULL;  
  8. CCLabelTTF* pChild = NULL;
  9. int nIndex = 1;
  10. CCARRAY_FOREACH( pTTFList, pObject )  
  11. {  
  12. pChild = (CCLabelTTF*)pObject;  
  13. if( pChild == NULL )  
  14. break;
  15. for( ; ; )
  16. {
  17. if( pChild == NULL )
  18. break;
  19. pChild->setVisible( false );
  20. CCDelayTime* pAction = CCDelayTime::create( 0.05f * nIndex );
  21. CCCallFuncN* pDone = CCCallFuncN::create( this, callfuncN_selector(CSecen::TTFItemDelayOver) );
  22. CCSequence* pSeq = CCSequence::create( pAction, pDone, NULL );
  23. pChild->runAction( pSeq );
  24. nIndex++;
  25. pChild = (CCLabelTTF*)pChild->getChildByTag( 0 );
  26. }
  27. }
  28. this->addChild( pHeadTTF ); 

注意,里面有个CSecen::TTFItemDelayOver的回调函数,这个函数代码如下:

  1. // 文字延迟回调
  2. void CScene::TTFItemDelayOver( CCNode* pSender )
  3. {
  4. if( pSender )
  5. pSender->setVisible( true );
  6. }

   这样就可以了。
   代码简单明确,故不做过多说明。如有不清楚理解的部分,可留言说明问题,我尽力解答。同时,因为要支持中文,所以使用了效率低下的CCLabelTTF,若有什么更好的建议,欢迎交流指出,谢谢。

2014年4月3日星期四

Cocos2dx 半透明遮罩 ,UI震动效果,渐变场景过度


    在《三勇者传说》(暂定名)的开发过程中,我遇到了一些小问题,这里记录下来,以便之后查阅以及他人分享建议。

    首先是最常见的场景渐变,cocos2dx自身有一定数量的场景渐变效果,原本无需做太多说明,不过既然算是一种小伎俩,这里也备注一下。
  1. CCScene* pLoginScene = CLoginScene::scene(); 
  2. if( pLoginScene ) 
  3. {
  4.     float fTime = 1.5f; 
  5.     CCTransitionScene * pTransScene = CCTransitionFade ::create( fTime , pLoginScene ); 
  6.     CCDirector::sharedDirector()->replaceScene( pTransScene ); 
  7. }
    然后是半透明遮罩,这在游戏需要进行暂停时,以及弹出信息窗口时非常常用。


ShadeLayer.h

  1. #pragma once
  2. //--------------------------------------------------------------------
  3. #include "CommonHead.h"
  4. //--------------------------------------------------------------------
  5. class CShadeLayer : public CCLayer 
  6. {
  7. public:
  8. static CShadeLayer* create( CCLayer* p_pUILayer );
  9. bool init( CCLayer* p_pUILayer );
  10. private:
  11. void MenuCallback(CCObject* pSender){}
  12. };
ShadeLayer.cpp

  1. #include "ShadeLayer.h"

  2. //--------------------------------------------------------------------
  3. CShadeLayer* CShadeLayer::create( CCLayer* p_pUILayer )
  4. {
  5. CShadeLayer* pLayer = new CShadeLayer;
  6. if( pLayer && pLayer->init( p_pUILayer ) )
  7. {
  8. pLayer->autorelease();
  9. return pLayer;
  10. }
  11. else
  12. {
  13. delete pLayer;
  14. pLayer = NULL;
  15. return NULL;
  16. }
  17. }
  18. //--------------------------------------------------------------------
  19. bool CShadeLayer::init( CCLayer* p_pUILayer )
  20. {
  21. bool bRet = false;

  22. do 
  23. {
  24. CC_BREAK_IF(!CCLayer::init());
  25. CCAssert( p_pUILayer, "p_pUILayer == NULL!");

  26. CCSize visibleSize = CCDirector::sharedDirector()->getVisibleSize();
  27. CCLayerColor* layerColor = CCLayerColor::create();
  28. layerColor->setColor(ccc3(0, 0, 0));
  29. layerColor->setOpacity(150);
  30. layerColor->setContentSize(CCSizeMake(visibleSize.width, visibleSize.height));
  31. this->addChild(layerColor);

  32. CCMenuItemImage* item = CCMenuItemImage::create();
  33. item->setContentSize(CCSizeMake(visibleSize.width, visibleSize.height));
  34. item->initWithTarget(this, menu_selector(CShadeLayer::MenuCallback));
  35. CCMenu* menu = CCMenu::create(item, NULL);
  36. menu->setTouchPriority( SHADER_LAYER_TOUCH_PRIORITY );
  37. this->addChild(menu);

  38. this->setTag( SHADE_LAYER_TAG );

  39. bRet = true;
  40. } while (0);

  41. return bRet;
  42. }
  43. //--------------------------------------------------------------------
    我们上面的代码是使用一个巨大的CCMenu去截获消息,虽然方法不传统,但是的确高效。如果使用传统的建议方式,Layer设置接收消息并重载消息回调四个函数,这个方法也行的通,但是代价较高,性能上也无优化,并不划算。注意的是,里面的宏 SHADER_LAYER_TOUCH_PRIORITY 必须小于UI默认的消息级别 -128,建议为-129.那么我们假如在这个遮罩层上放置新的UI或者Layer一定注意将新的UI消息级别高于这个 SHADER_LAYER_TOUCH_PRIORITY,即建议为-130以下。
    它的调用方式如下:
    1. // 在某个Scene中添加遮罩层
    2. this->addChild( CShadeLayer::create(this), 100 );
        最后,记录一下UI显示时的震动效果。我们通常显示一个UI,并不希望它突然就出现在屏幕上,而是经过一个极短的动画过程再显示。我这里介绍一种震动效果。代码如下:

      1. CCAction* shakeAction = CCSequence::create(CCScaleTo::create(0.0, 0.0),
      2. CCScaleTo::create(0.12, 1.08),
      3. CCScaleTo::create(0.10, 0.92),
      4. CCScaleTo::create(0.10, 1.04),
      5. CCScaleTo::create(0.10, 0.96),
      6. CCScaleTo::create(0.10, 1.0), NULL);

      7. // 增加UI层
      8. CUIPanelLayer* pLayer = CUIPanelLayer::create();
      9. if( pLayer )
      10. {
      11. pLayer ->runAction( shakeAction );
      12. this->addChild( pLayer );
      13. }
          这样就模拟形成了一个震动显示的UI效果。
          今天就记录到这里,欢迎讨论~